

Whether it’s a large cappuccino or a quick piccolo, there’s no argument that coffee tastes beautiful with warm, creamy, expertly prepared milk. Here at Whitehorse, we are always striving to perfect the texture and pour of our milk, and one question our customers keep asking is, “How can I achieve this result at home?” Most home espresso machines can steam milk, but it can be a bit tricky to get the result you want. At Whitehorse, we believe that good coffee only requires a little bit of guidance, and a lot of practice. So to provide a little bit of guidance, our barista Dom shares some tricks he’s learnt over the years that can help you make perfect texturised milk, every time.
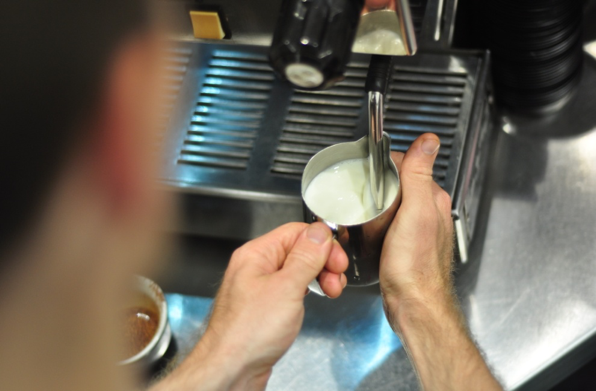
The milk clock position
If it isn't hissing and making a tssst sound then no air is being introduced. If you are in the milk clock position then all you need to do is pull the milk jug fractionally downward on the steam tip. This will increase the amount of foam being made.
If you feel that enough foam has been formed, pull the milk jug upwards slightly. By burying the steam tip under the milk it will stop creating foam and instead will combine what has been created. The single most important element is to keep the milk spinning in a whirlpool motion. If you have the jug in the milk clock position it will do this naturally. And the best bit is that you should not have to move the jug at all if you position it perfectly - no drawing down to introduce froth, no submerging to stop froth, as the milk’s mass will naturally increase and the steam tip will be lower in the milk. In this case it will be combining and spinning your now steamed microfilm milk.
Most people like a hot cup of coffee, except for coffee judges and critics! It can be misleading to stop steaming a milk jug when your hand gets warm. It will feel hot to touch, but unfortunately it will only be warm to drink. The key to make sure the milk is hot enough, is when your hand starts to get really hot, count to 3 in your head then turn off the steam. This should heat your milk to 60 - 70 degrees celsius. If you’re a purist and you want it to be the temperature critics prefer, warm the milk until your hand is hot, then turn off the steam. This should heat your milk to 55-60 degrees celsius. A good way to get it exactly right is to use a thermometer. There’s no shame in using a thermometer if it’s going to deliver you perfect milk every time. I've competed nationally at barista competitions and 50-55 degrees gives the judges the best chance to taste the specific origin character of the coffee, but if I'm making a cup of coffee for family and friends, something in the order of 70 degrees is always a crowd pleaser. I hope this helps you keep it special. Dom

1. Gauge your steam pressure
Start by understanding the steam pressure of your home machine. You will get an understanding of your machine by using it everyday, but it’s handy to observe the steam before you start altering your method. Place a cloth on the bench under the steam wand and turn it on. Be careful not to get any steam on your skin, it’s hot! While watching the steam express, consider these questions.- Does your machine instantly produce steam?
- Does it come on slow?
- Is the steam solid or are there a few water droplets to start?
Old machines and new machines
As a general rule, older machines have a very thin steam wand which produce slow and low pressure steam. If this sounds like your machine, don’t worry you can still get great results, if you follow the ‘old machine’ steaming method below. In contrast new machines have a thicker steam wand which produces instant steam at higher pressures. If you’re fortunate enough to own a newish machine, then please choose the ‘new machine’ steaming method below.
2. How to control milk with different machines
Old style or low pressure machine
To get the best results with an older machine you will need to create small amounts of froth, then recombine the froth into the rest of the milk and repeat this process several times. Stay with me, it’s not as hard as it sounds. This method is a little delicate, but the result is worth it.- Before placing the wand into the milk, briefly turn on the steam to release condensation.
- Angle your steam wand and jug into the milk clock configuration.
The milk clock position
- Gently hover the tip of the wand on the surface of the milk, turn the steam on and introduce air. It should make a consistent scratchy “Tsst” sound. About 1/2 to 1cm below the surface of the milk is a good depth for milk texturing.
- If you need to introduce a little more air, carefully pull the milk jug down a little to make foam.
- When a small amount of foam is made, ensure a whirlpool is combining that foam back into the rest of the milk. Avoid big gulps of air as this will ruin the texture.
- Repeat this process a few times until you have enough foam and the jug is really hot in your hand.
- At this point count to three and turn the steam off.
- To remove any bubbles from the milk, tap the pitcher onto the bench and then give it a slight swirl.
New style high pressure machine
If your machine has high pressure it will steam milk faster, which can be a little trickier to learn as things are happening much faster.- Purge the excess condensation in the steam wand before placing it into the milk.
- Place the steam wand into the milk clock position (as above), turn the steam on and introduce air. It should make a consistent scratchy “Tsst” sound. About 1/2 to 1cm below the surface of the milk is a good depth for milk texturing.
- If you need to introduce a little more air, carefully pull the milk jug down a little.
- Hold the jug in place, make sure the milk is whirlpooling, and in a very short period of time (maybe 10 - 15 seconds) your milk will be ready.
- To remove any bubbles from the milk, tap the pitcher onto the bench and then give it a slight swirl.
What do I do if it's not making foam?
If it isn't hissing and making a tssst sound then no air is being introduced. If you are in the milk clock position then all you need to do is pull the milk jug fractionally downward on the steam tip. This will increase the amount of foam being made.
How do I stop the foam being made?
If you feel that enough foam has been formed, pull the milk jug upwards slightly. By burying the steam tip under the milk it will stop creating foam and instead will combine what has been created. The single most important element is to keep the milk spinning in a whirlpool motion. If you have the jug in the milk clock position it will do this naturally. And the best bit is that you should not have to move the jug at all if you position it perfectly - no drawing down to introduce froth, no submerging to stop froth, as the milk’s mass will naturally increase and the steam tip will be lower in the milk. In this case it will be combining and spinning your now steamed microfilm milk.
3. What temperature should the milk be?
Most people like a hot cup of coffee, except for coffee judges and critics! It can be misleading to stop steaming a milk jug when your hand gets warm. It will feel hot to touch, but unfortunately it will only be warm to drink. The key to make sure the milk is hot enough, is when your hand starts to get really hot, count to 3 in your head then turn off the steam. This should heat your milk to 60 - 70 degrees celsius. If you’re a purist and you want it to be the temperature critics prefer, warm the milk until your hand is hot, then turn off the steam. This should heat your milk to 55-60 degrees celsius. A good way to get it exactly right is to use a thermometer. There’s no shame in using a thermometer if it’s going to deliver you perfect milk every time. I've competed nationally at barista competitions and 50-55 degrees gives the judges the best chance to taste the specific origin character of the coffee, but if I'm making a cup of coffee for family and friends, something in the order of 70 degrees is always a crowd pleaser. I hope this helps you keep it special. Dom
Leave a comment